Go to Blogger edit html and find these sentences.Now replace these sentences with your own descriptions.This theme is Bloggerized by Lasantha Bandara - Premiumbloggertemplates.com.
All the Portfolio Student need to organised Bowling tournament inter College. All the student need to prepare that tournament. The preparations include :
One of the most common PowerPoint questions that we get asked is how to add music to a presentation and how to get it to play across multiple slides.
Step 1. Download your music in MP3 or WAV format.
The best format to download songs in is in the MP3 format. This has the smallest file size.However there is one big problem with mp3 files - you can only link but not embed mp3 files into PowerPoint.
(This will not be possible if you are downloading music from the Apple iTunes service. If you have downloaded music from Apple iStore you will first need to convert them to mp3 format) You will also need to make sure that you have all of the copyright permissions and performing rights clearances to be able to store the music in your presentation.
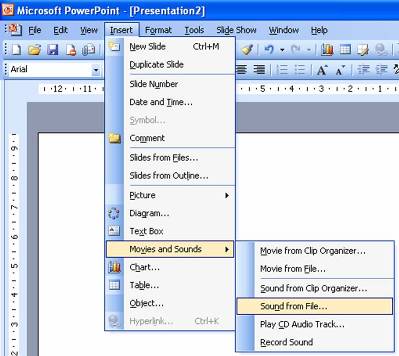
Step 2. Insert the music in your PowerPoint presentation.
From the main menu Insert > Movies and Sounds > Sound from file
Then from the Files of Type drop down box select mp3 format.
You will then get a message about how you want the music to start
Step3 - Setting the music to play across multiple slides
A lot of people have asked if it is possible to keep the music playing across multiple slides- for example if you wanted to make a slide show of someone's life with music playing in the background - or it could be a useful feature at a trade show.
You do this using a feature called Custom Animation. Select your music file then Right click (not the usual left click) and select Custom Animation. You can do this by selecting Slide Show >Custom Animation
How you do this depends upon which version of PowerPoint you are using.
For older versions of PowerPoint
Then select Multimedia Settings afterwards and make sure that you have selected While Playing >Continue Slide show You will then need to set the Stop Playing button and enter in the Stop Playing > After number slides the number of slides that you would like the music to play for.
If you are using PowerPoint XP the procedure is slightly different
Custom Animation > Right Click on Media and select Effect Options
You will then need to set the Stop Playing button and enter in the Stop Playing > Afternumber slides the number of slides that you would like the music to play for.
Step 4. (Almost there). How to embed music in your presentation
The last gotcha in the process is that the music may not be embedded in your PowerPoint presentation. This means that if you save your presentation onto a CD or you are to email it, then the music may not automatically go across. It all depends upon the file size of the music.
If you want the music to be embedded in the presentation you will need to follow a couple of steps.
1. Make sure your music is in WAV format (mp3 files can only be linked and not embedded) 2. Increase the value in the Link sounds with file size greater than box to a value greater than the file size of the MP3 file. For example if the file size is 4.5MB then you will need to include a value higher than 4500. A good general purpose size that should incorporate most song files is 6000 as most mp3 files are less than 6MB. Be careful as some classical music tracks could be longer than this.
The only downside is that the file size of the final file could be quite large.
There is a 50 Mb limit for embedding WAV files. For eample if you had two WAV files of 34 MB the you will be able to embed them, but it would make your file size over 68MB.
2010 has come of age when it comes to embedding videos. In just a few simple steps you can select a video clip from your PC or a website (don’t forget the all-important copyright issues, though) and embed it in your presentation.
A couple of pointers regarding video formats
When it comes to which file format is best to use in a presentation I guess there are as many opinions as there are file formats. Suffice it to say that when it comes down to it you will probably find that either one of these will work perfectly satisfactorily on almost all computers.
AVI (Audio Video Interleave) – A long-established format that will work fine as long as you bear in mind that it is a bit heavy on file size. Figure on about 5mb for a 1 hour video. Admittedly, an hour-long video clip in a presentation is somewhat extreme but it always pays to keep files as small and compact as possible. Quality of these files is excellent.
WMV (Windows Media Video) – This is a compressed video format and therefore a smaller file size. My choice would be this format as it provides the best compromise between quality and size.
MPEG – (Moving Pictures Experts Group) – This format is also perfectly suitable for presentations as these files are also much smaller and are of high quality.
SWF – (Shock Wave Flash) – A format used mainly for web-based applications and animations. It has a small file size and audio capability.
Fig 2. Ribbon - insert
For more in-depth discussion on video formats a quick Google will provide a wealth of information. Any one of the above will be more than satisfactory for your presentation, though.
Embedding your video clip
Make sure you have selected ‘Insert’ on your ribbon. By the way, a quick way to do this is to use the mouse wheel to choose between ‘File’, ‘Home’, ‘Insert’, etc. The scroll wheel jumps from tab to tab as you scroll the wheel. Or simply click the tab to select.
Fig 3. Video selection icon
On the right is the ‘Video’ insert menu/ribbon selection icon and on clicking you are offered three further choices. We will deal with them from top to bottom.
Video from File
Selecting this option will open a dialog box so that you can navigate to where your video clip is filed on your PC.
Fig 4. Video dialog box
Once you have found your clip and selected it, click the insert button and the clip is embedded into your slide, as you can see here.
Fig 5. Inserted video clip
The image below shows the formatting dialog box for the video player inserted into your slide.
Fig 6. Formatting options
Customising the video player is straightforward and provides a good range of options, such as border colour and style. Also available are adjustments for the video itself. Selecting the ‘Video’ option offers brightness and contrast options of the video output.
Power Point 2010 offers video editing functionality as well. No more do you have to spend ages editing in complicated software to get the length of the video clip correct.
Notice the ‘Trim Video’ option on the left? What a bonus! Selecting this option opens a simple window where you can tweak your video clip to the exact length you require.
Fig 7. Video editing options
Below the thumbnail of the video on the right in Fig. 8 you can see a green and a red marker.
Click and drag the green marker to your starting point. Note how the thumbnail adjusts to show you the starting point. The red marker works in the same way. Just drag it to your end point. The Start and End time fields show the corresponding times and top right you can see the duration of your video clip.
Before I move onto the next choice of video embedding, take a look at the ‘Size’ option. You can see this in the Formatting options image in Fig. 6 above. With this option you can change the video display to suit your slide.
Fig 8. Editing dialog
Video from Website
On the right is the dialog box that opens when you choose to add a video from a website.
Let’s suppose you have a number of video clips on YouTube, or perhaps your website has a video you would like to add to the presentation.
Fig 9. Video embedding dialog from websites
Fig 10. Embedded video player
On the right is an embedded video clip from the Call Centre Helper YouTube page.
Note: You must choose the ‘Old embed code’ option. None of the other options will work. PowerPoint alerts you to this when you click insert after you have copied and pasted the embed code into the window in Fig. 9.
Below you can see a snapshot of the embed option on the YouTube website for Call Centre helper.
Fig 11. Embed code and player options from YouTube
To embed your video into your presentation you need to copy all the code in the window above, starting from “
ELECTRONIC PUBLICATION DESIGN TECHNOLOGY (EPDT)
-
Electronic Publication Design Technology (EPDT) adalah subjek yang
memfokuskan ke arah penerbitan sesebuah majalah dan media-media lain. Ini
adalah hasil y...
-
1.ELEMENT OF DESIGN
- Menerusi subjek ini, saya dapat mempelajari cara - cara menyusun
elemen rekabentuk dengan baik dan kemas untuk harmonikan eleme...
Anime character that best reflect to you
-
Anime character that best reflects to me is Midoriya Izuku or his hero name
(deku).Because he never give to be hero.However, he don't has super power
and...
aiskrim cempedak
-
resipi nie khas untuk korang yang ada buah cempedak yang banyak and dah tak
tahu nak buat apa, so try laa buat aiskrim cempedak nie....
* Bahan-bahan ( 1 l...
kasual muslimah
-
JIKA dulu wanita wanita yang memakai tudung mungkin agak terbatas gaya
kasual mereka, malah rata-ratanya kurang bergaya. Kini, tidak lagi. Gaya
dipelbaga...
Kung Fu Tradisional China
-
1.Mian Quan
Mian Quan (secara harfiah "Cotton Fist") adalah Cina utara seni bela diri
gaya yang kemungkinan besar berasal dari provinsi Hebei . Tidak...
Sony Xperia Tipo
-
Quick specs
- 99.4 g
- 3.5 ounces
- 103 x 57 x 13 mm
- 3.4 x 2.2 x 0.4 inches
- Talk time (up to): 5 hours [1]
- Standby time (up to):...
Warships & Aircraft
-
Hi guys...
Today i want to share with u guys about warships and aircraft.
Actually i kinda liked this kind of warships and aircraft. They were so
cool and...
The Nike T90 Strike IV
-
*The Nike T90 Strike IV FG: Power and accuracy*
Designed for the elite player who kicks with force and passes with purpose,
the Nike T90 Strike IV FG Men'...